
Studio Lights w/ Soft Box Cover
Product Description: Studio lights with soft box cover. Complete with carry case and power cord.

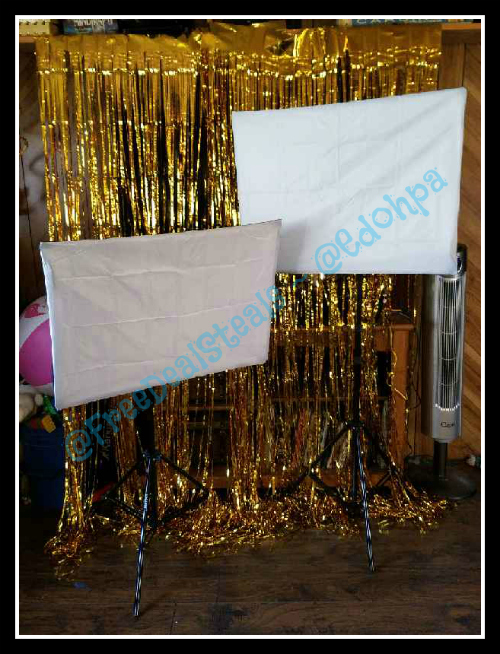
Package includes: 2 x LED lamp holder. Max 45W 5000K, include UL standard cable & plug. 2 x light stand 83″/210cm height 2 x Soft box size: 50 x 70cm including four steel sticks and 1 x Carrying Bag
Features:
2* 126 Ultra High Powered Super Adjustable Bright LED Lamp: The lamp holder is equipped with fan, which allows the lamp to maintain a constant temperature and longer life. The knob on the holder makes it easier to adjust brightness.
2*Rectangle Soft box for LED lamp 20″x28″: The soft-box is made of grain fabrics materials which integrates heat-resistant, lowest aging and long service life. It can diffuse the light, provide softer and warmer light to give you the perfect lightness you need to act as a main light or a fill light to illuminate your subject or scene.
2 x 86″ Professional Quality Aluminum Adjustable Light Stand: Height: Adjustable from 33″ – 86″ Weight: 2.20 lbs Closed Length: 28 ” Diameter of legs: 0.63″ Die Cast Aluminum Construction, Quick and Easily Fold, Slip Resistant Rubber Tipped Legs, Black Non-Glare Finish, Quick Release Levers for Smooth Height Adjustments
Specification:
Accurate Color Rendering Index (CRI): 85~90
Power: Max 45W
Input Voltage: 100~240V 50/60Hz
Output Voltage: 24V
LED quantity: 126
Size: 20 x27″ (50 x 70cm)
These studio light stands arrived in a square canvas style zippered bag with reinforced wide strapped handles. The way the storage bag unzips is a little hard to explain, but it sort of zips open on the corner instead of the top or side as far as if you were holding it by the handles and looking down.

Inside the canvas storage bag, were two long narrow cardboard boxes two Velcro pouches and two smaller square cardboard boxes.
The long narrow boxes held the tripods, the Velcro pouches held the reflective shades that go around the bulb and the smaller square boxes held the lamp heads.
This canvas bag does not have compartments of any kind to protect or separate your items when transporting so I kept the cardboard boxes they were shipped in and will continue to use them as an added safety support. Everything fits well in the storage bag even using the boxes as well as ample space for extra bulbs or other necessities.
Also included in the package were assembly instructions for attaching the lamp head to the tripods and the reflective cover to around the lamp.
Assembling Your Studio Lights
The first step is to set the tripod up at a comfortable height for attaching the lamp head. You need to pull the 3 legs of the tripod out to start the movement. Once you start to pull them outward, the center starts to slide down the shaft of the main support pole allowing the tripod legs to spread out further.
Once the legs are fully out and the center has risen about 3/4ths of the way down the support pole in the center, it then starts going the other way. you can then start to press down on the center of the tripod legs and force it back down towards the bottom, this increases the height and brings the tripod legs back up. Once you have the legs at the angle you need for use you can lock in place with the screw attachment.
The main center support pole has two more sections inside that telescope upwards to the height you want or need for your studio lights. I pulled one up to meet my height while I attached the lamp head. I did fully expand the center poles to see how far they would go and they go above and beyond my ceiling. Each of the center poles are also lockable with a clamp/snap style lock.
Attaching the lamp head is as simple as sliding the mount over the center pole tip and locking in place with the outside screw that tightens against the pole on the inside of the mount.

Attaching the reflective lamp cover or soft box was the trickiest part of the assembly process for me. The instruction images show putting the reflective soft box cover on the lamp head prior to putting the lamp head on the telescoping pole, but for me it was easier to attach and work on it at standing height level by myself. I’m sure you could do this on a table or something and attach afterwards but it was easier for me this way.. Anyways..
The soft box lamp cover comes in multiple pieces. You have the main reflective cover, 4 post that attach to the lamp head at roughly 10 o’clock, 2 o’clock, 4 o’clock and 7 o’clock. The metal end of the posts are inserted into the lamp head and the protected end with the black dulled tip goes into the inserts on the corners of the reflective cover piece.
The last step in setting up your studio lights is to place the white Velcro cover over the reflective cover to create the soft box effect. This is easily done by starting at one corner and working your way around while attaching the middles sections via the Velcro. Once the white cover is in place your studio soft box lights are ready to use!
Using Your Studio Lights
Using these studio lights for the first time is simple once you have them completely set up and assembled.
On the back of the lamp head you will see a dial and on/off button. The on/off button is pretty self-explanatory, but the dial is for the light brightness. These lights ARE BRIGHT when on full spectrum.
When we fit turned the lights on we all thought they were pretty bright, but as soon as my husband started turning the dial we realized they were on the lowest setting. The lamp head has a built-in fan to keep your lights cool for continuous use.

The white cover does a great job softening the light when directed towards a specific object or person. Without the soft box, these lights can be pretty harsh on the eyes. So either make sure the dial is turned down fully to the lowest setting or make sure the white cover is on to help dilute the brightness until you are ready to use. One this eliminates temporarily blinding your subject or yourself, as well as saving energy.
The lights are powered by a two piece DC cord power adapter. One end plugs into the lamp head and other into a standard outlet.

Overall this is a nice set of studio lights with soft box attachment. Looking forward to taking many photos with the kids and family. Still photography for my review items, fun photo shoots with my kids and my son is looking forward to setting up a stage with these lights and create
I learned a lot from this article!
I definitely want to take a photography class to know all these things!
Lighting is so important for good photography. I actually DIY’d myself a pair of soft lights.
Looks like a great set-up. I am always trying to improve my skills–photo, writing, or otherwise. Can’t wait to see all the photos that come from the studio lights.
Thank you for this! I will be sharing this to my blogger friend. It will surely help her.
I have been thinking about getting some studio lights. This was such a great read for me!
This is one area I have yet to invest in. I use natural light, but really want to venture into more and need some lighting like this.
I need this for my photos. I have been trying to improve my pictures. Lighting makes a huge difference.
Sure wish I had the room and the know-how for this! I love taking pictures….just not real good at it. This looks like very professional equipment to me. It would make a great gift though, for someone I know who is really intp photography, and he is good at it, too!
This definitely sounds like a great set for a photographer! Thank you so much for sharing!
loving the lights looking good
Wow! I think if my kids got more into photography, I might have picked something like this up for them.
These are nice looking good
Looks neat for those who need it. (not me).
slehan at juno dot com